


HealthKit & Google Fit Integration for Healthcare Apps (iOS & Android)
Want to sync health data across iOS and Android apps? This guide explains how to integrate Apple HealthKit and Google Fit for smooth, secure tracking in cross-platform health and fitness apps.

.webp)
In today’s digital health landscape, staying fit isn’t just about eating well or getting steps in – it’s about understanding your full well-being picture. From tracking heart rates to monitoring sleep, more people than ever rely on mobile apps to support their health goals. And behind many of these powerful tools are Apple’s HealthKit and Google Fit APIs – key technologies that collect and organise user health data from various sources.
Tech giants like Apple and Google have built entire ecosystems to support this shift. Apple launched HealthKit alongside iOS 8 to help apps access and share health data in a secure, user-friendly way, while Google Fit offers a flexible Android alternative. These platforms don’t just collect data – they help transform it into personalised insights that support smarter treatment, better habits, and improved outcomes.
In this guide, we’ll walk you through everything you need to know about integrating HealthKit and Google Fit into healthcare apps – across both iOS and Android. We’ll also cover core differences between the platforms and point out technical considerations developers should be aware of. If you're looking for a broader overview of how these APIs help with health and fitness app development, be sure to check out our in-depth article on that too.
What Do You Need to Know About HealthKit and Google Fit
Before we delve into the technical aspects of integration of these tools, let's compare their main features.
Note on naming: Many users search for terms like “Google HealthKit” or “Android HealthKit”, but these are not official names. Apple HealthKit is exclusive to iOS, while Google Fit is the Android equivalent. Both are health and fitness APIs that allow apps to sync data from wearables and other sources.
Most people rely on more than just one physical activity tracker with each of these apps perfectly calibrated to their specific tasks. Google Fit and HealthKit become bridges between data from different trackers and present users with a holistic picture of their health, well-being, and exercise progress.
What Is Google Fit and How Does It Work in Android Apps?
Google Fit is Google’s health-tracking platform for Android. It helps apps collect and manage health and fitness data — such as steps, heart rate, sleep, and workouts — using a unified API. With Google Fit integration, Android apps can read and write health data from multiple sources, including wearables and third-party trackers. The platform supports custom data types and offers tools for syncing real-time and historical activity, all while following Google’s data privacy and usage policies.
.webp)
How to Start Integration with Google Fit?
So, two distinct ways of communicating with Google’s server exist. You can connect to Google’s API via:
- REST API. This is more reliable in circumstances where the level of technical sophistication is low and for dealing with cached data.
- SDK. This is an automatic connection to the server, which is highly convenient when dealing with well-advanced, documented, and maintained levels of SDK sophistication.
Let’s overview the aspects you should pay attention to when setting up Google Fit & developing the Google Fit app.
Where to Store Data: Local Storage vs Fit server
To minimise overloading the server and thus increase performance, the majority of APIs do not necessarily connect to the Google Fit server. Instead, they utilise local storage to read and write data. This arrangement allows all local Google Fit apps to access the data — even without a network connection. Similarly, changes made locally are immediately available for a user, which increases the app’s accessibility.
That said, with the increase in performance and offline-related accessibility come difficulties with testing data updates: because synchronisation isn’t happening immediately after a change is detected, false negatives can be reported. It’s best to keep that in mind.
Ways to Recognise Custom Activities
Developers of health-oriented apps and fitness solutions can create their custom activities as well as borrow activities, created by Google Fit, — and they might need to separate those within the app. Separation is done via:
- Calling setAppPackageName when creating a custom activity and verifying the value it returns when checking the downloaded activity’s type. On how to use setAppPackageName: developers utilise this DataSource.Builder when gathering data from custom sources (String packageName) or when creating a data source (Context appContext). This method is most often used when dealing with uninterrupted data streams, e.g., running for an hour without a break.
- Using activity segments. Developers create a dataset containing points of type com.google.activity.segment. This method is used when it’s necessary to track more versatile & complex custom activities. Every point “starts off” a new type of activity — or a break — within the exercise. Like doing jumps for 10 minutes, then taking a 5-minute break, then jumping with a skipping rope.
For data streams from complex exercises, it’s common to combine .setAppPackageName with ActivitySegments. Google provides detailed documentation of ActivitySegments, so check this one out.
Permission to Transfer Data
The first concern that app developers must take seriously is the privacy of users' data. Where data has to be collected, this must be done with express permission from the user. Users are often willing to share some basic biological data but withhold the more sensitive ones, so the app always has to have an explicit and easily understandable data-sharing consent form for each data type. Google Fit allows creators to compartmentalise accessible data into three groups:
- Public data. Data provided by the platform that contains the com. google prefix. Includes data about nutrition (like meal type), activity data (sleep, meditation), and location.
- Health data types. Health information that is specific to the user’s condition, like levels of blood glucose, body fat percentage, temperature, heart rate, menstruation data, etc. This type of data is provided by the platform and is restricted due to its sensitive nature.
- Aggregate data types. This data type is used for health and wellness information aggregated during a certain time period (calories burned during the workout, distance), or according to activity (different phases of sleep) or activity segment (custom exercises).
There are also private custom data types that developers create specifically for their apps.
Reading Data
To read a user's data, you'll first require an active Google Account object. An account with an assigned value will have an authenticated app without authorisation. To get this authorisation, you'll need to request permission to read data of the required data types.
Users will be promoted to grant permission through an SDK-displayed permissions dialogue. Once this permission has been granted, the app can read data from the server and developers can specify how much of the required data they need. Also, it’s important to make sure that the app gathers data not only from local storage but from the server, too (for instance, to get historical data about a person’s health if there’s any.)
Collecting Data from Sensors
One of the APIs that Google Fit uses is Sensor API. It allows health & fitness apps that aren’t connected to additional 3rd-party hardware to rely on the smartphone as the source of new data. Three groups of sensors exist:
- Motion sensors measure rotation and acceleration.
- Environmental sensors measure light, temperature, ambiance, and air pressure.
- Position sensors collect a device’s physical position data.
Before querying for any data, you must first figure out if the devices/OS of your target users will support sensors gathering that data (it’s impossible to cover everyone, though, so features for feedback about sensors being absent/malfunctioning are needed). Note, that it’s important to track the onAccuracyChanged callback to monitor the sensors’ margin of error. Also, devices with Android 10+ using Google Fit also require access to Motion Data Permission, so you should account for that when developing your permission policies and consent forms.
Google Fit Set-up Steps
To set up the Google Fit API, follow the steps outlined below:
- Go to the Google API console
- Tap on Create Project


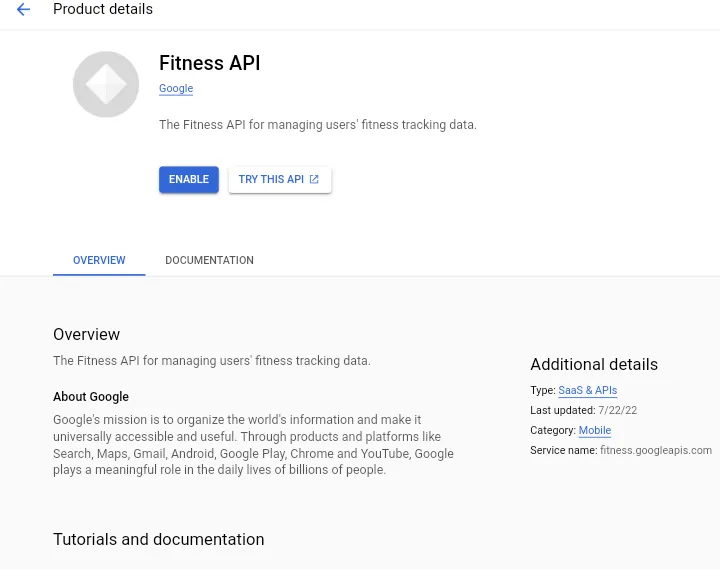
- Click on Enable API and Services. You'll land on the API library page, where you can use the search box to locate the Fitness API. Enable the Fitness API
- Now proceed to create OAuth Client ID for a web application.
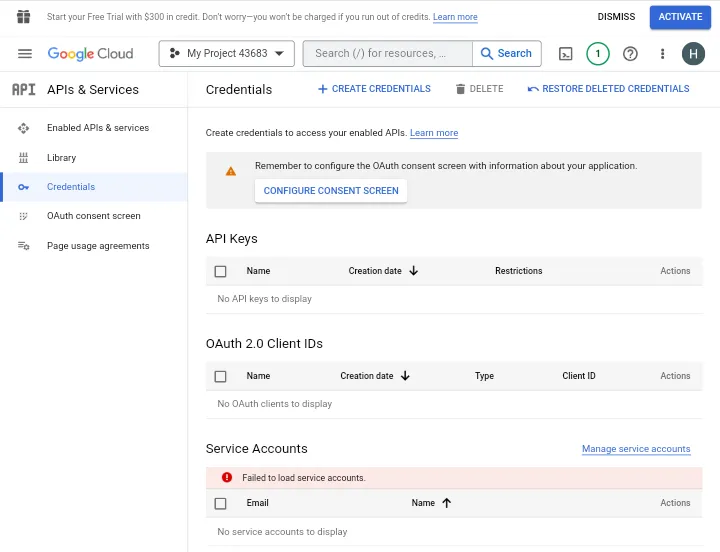
Select the following as your redirect URL: https:/script.google.com/macros/d/{scriptID}/usercallback
- Go to Tools, then click on Script Editor
- Enter a code to authenticate OAUTH2 version 41
- Copy the Client ID and Client Secret. Both can be found at the top of the code.gs file.
- Scroll back to the Google Fit sheet and click on Authorise.
- In the Google Fit menu, tap on Get Metrics to complete the setup and allow your app to get data.
If you have difficulties with this process, contact us — we’ll be happy to help.
What Is HealthKit and How Does It Work in iOS Apps?
HealthKit is Apple’s native health data platform for iOS. It allows apps to securely read and write user health data — from heart rate and sleep to clinical records — stored directly on the user’s device. With HealthKit integration, you can build iOS health apps that track activity, offer insights, and support wellness goals, all while meeting Apple’s strict privacy requirements.
.webp)
How to Start HealthKit Integration?
If you are developing an iOS health-related application and would wish to integrate HealthKit API, the following are key steps you'll have to complete first.
1. Get proper account. You'll require an active developer account to use HealthKit in your app — a person with an Apple developer account. Then, go to Project Navigator, select the target with the name of your project, and assign a team in the Signing section within the General tab.
2. Activate entitlements. Then, you’ll need to go through HealthKit entitlements for your app to use the framework. Click on the Capabilities tab and switch to HealthKit.
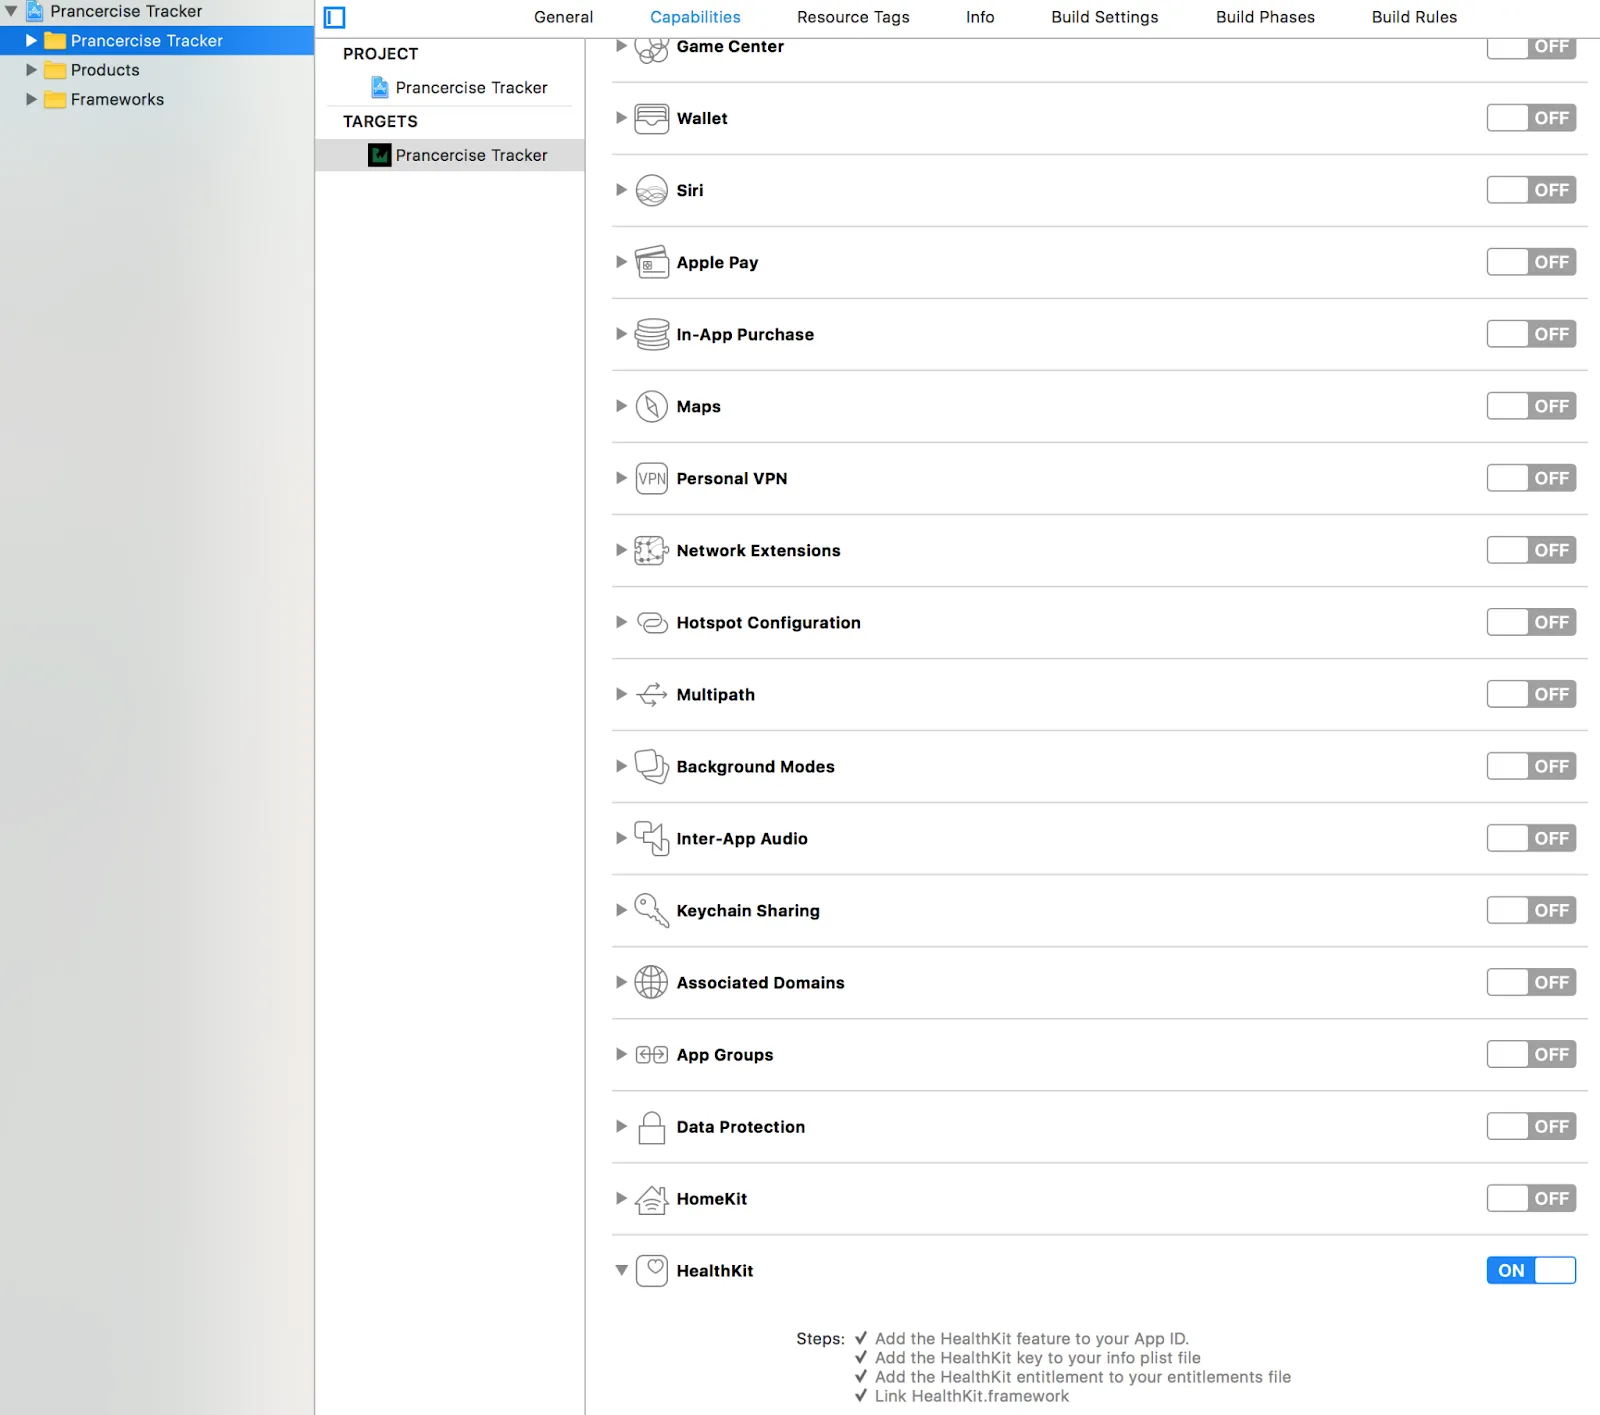
Then, XCode will automatically configure & calibrate the framework.
Request Permission and Access HealthKit Data
After you’ve done that first step, you need to ask people to share their data and authorise HealthKit.
3. Ask for the user’s permission. Specify why you need users to share data with you within Info.plist file. Add privacy keys Health Share Usage Description and Health Update Usage Description with a breakdown of what data you want to read with HealthKit for the former and what data you want to write to the framework. Typically, both will contain an easy-to-understand explanation of what this data helps you do (more efficiently track patient’s exercising progress, help you develop a more detailed nutrition plan, etc.)
*Note: If the user declines the permission, the app doesn't actually know it. What you get is an empty array of data. This is done on purpose by Apple for privacy reasons. So, if you get an empty set of data, it can be caused by the lack of permissions.
4. Authorize HealthKit by calling the authorizeHealthKit(completion:) method, which will check the availability of HealthKit, check if users have granted permission for data sharing, and separate the data into read and write types. Note, that without the Privacy Keys being set, HealthKit authorisation isn’t possible.
Read HealthKit Data and Display It in a UITableView
Reading HealthKit data and displaying it in a UI is the next step in HealthKit integration. It requires your app to work with characteristic data (data that doesn’t change through the lifetime), such as blood type or date of birth, as well as samples that refer to data that constantly changes, such as weight or blood pressure.
Read Characteristics
In this example, we’ll be using the Prancercise Tracker app and will attempt to calculate your users’ body mass index by connecting it to HealthKit.
Note, that the app only reads and does not write biological characteristic data from the HealthKit, so users will have to have the data readily available in the Apple Health app.
To read this data:
- Open ProfileDataStore.swift via the Xcode. You’ll be able to access all health-related user data.
- Enter the following method into ProfileDataStore to enable your app to read the user data.
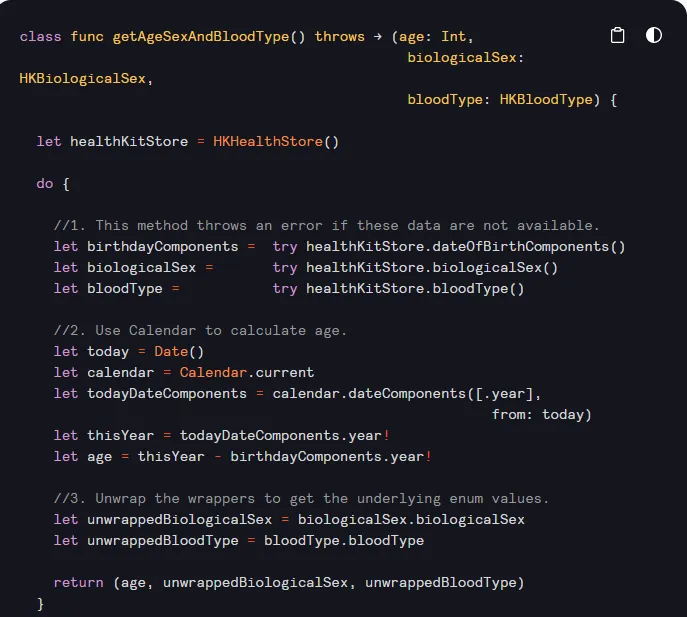
To read the characteristic data, your app will call the getAgeSexAndBloodType() method to access HKHealthStore.
Update User Interface
Now that we’ve dealt with the app’s logic, it’s time to update UI and connected it to that logic:
- Navigate to the ProfileViewController.swift.
- Search for the loadAndDisplayAgeSexAndBloodType() method — it displays biological characteristics on the interface.
- Input the code below into that method:
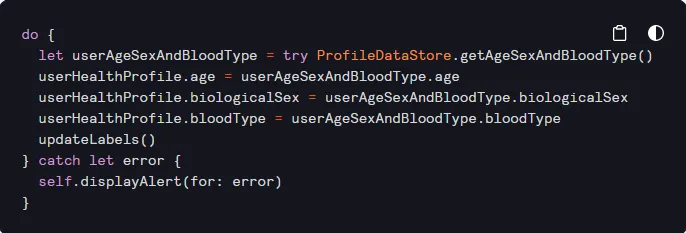
This code has to update new fields in the user’s health profile via the updateLabels() method on UserHealthProfile. After that, we’ve got to connect this method to the UI. You can do that via this piece of code:
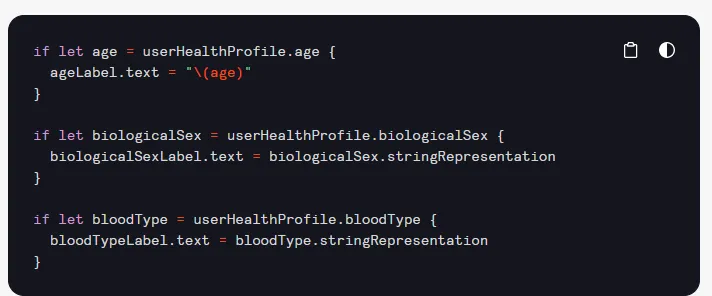
If users set their data within This code will format and place the characteristic data into respective labels. To display it within the UI, stringRepresentation will change it into a string.
Once you're done with this stage, you're now ready to create and run your health-related app. Users will be able to allow Prancercise Tracker to read the HealthKit data Profile & BMI section in their iOS Health app.
Collect/Query Samples
At this stage, you're now configuring your app to collect samples, – only then you’ll be able to calculate BMI. You’ll need the users’ height and weight. Because samples are always changing, they are harder to access – you’ll need to use HKSampleQuery.
- Specifying the type of sample to be queried.
- Any other useful parameters can be filtered out/sorted within the NPredicate or NSSortDescriptors.
- Set up the query.
- Call HKHealthStore’s executeQuery() method to access the results.
Load the following method into the ProfileDataStore.swift class below the getAgeSexAndBloodType() method:
.png)
This method takes in a sample type and then builds a query to collect the most current sample. If executed correctly, the system returns a correct sample result which ProfileViewController then, again, assigns to a label.
Display Samples in User Interface
Data samples in the app’s UI should be easy: it’s already updated, and the UI is connected to the logic. What’s left is to add a function that'll upload the samples. The processed samples are then prepared for UI display and the function also calls updateLabels.
Go to the ProfileViewController.swift and enter the code below into the loadAndDisplayMostRecentHeight() method.

It doesn't matter which sample you wish to display in the user interface. Whether it is height, weight, or distance walked, the process is the same; you only need to specify the type of sample in the method.
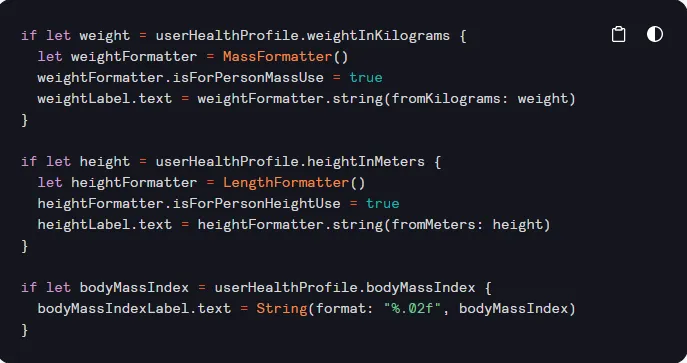
The last step in this process is to ensure that you've got the updateLabels function aware of these new changes.
Save Samples
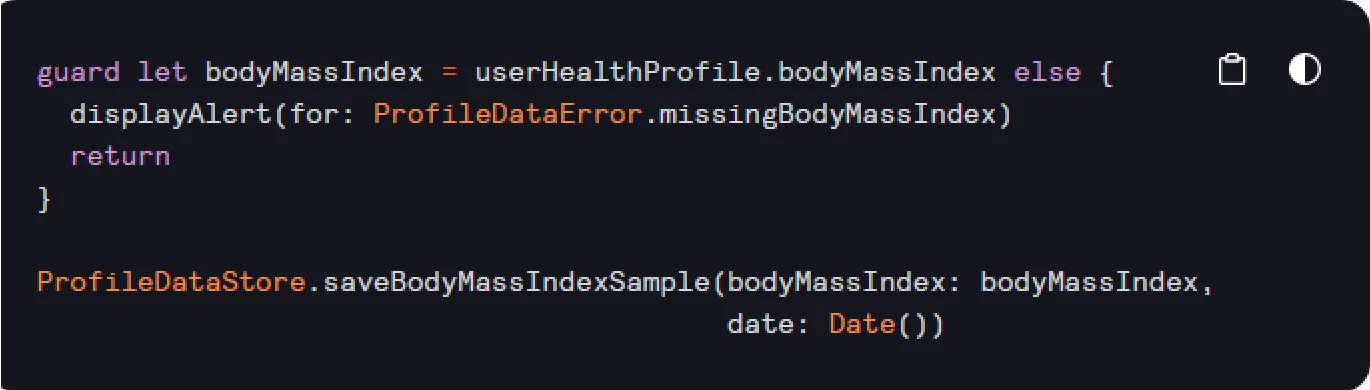
To record a sample of user's body mass index, open the ProfileDataStore.swift and simply add the following method:
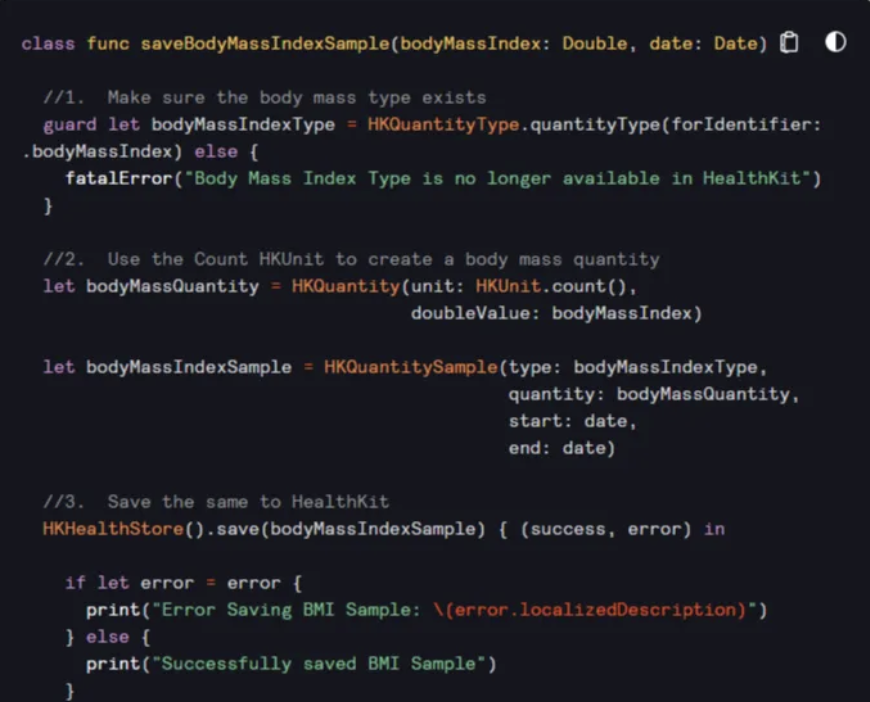
Because Prancercise Tracker calculates BMI itself, what this code does is figure out if data is accessible for Health apps and pulls it into the app. As earlier, you need to first figure out if the user has the data you can extract via HealthKit and if it’s accessible.
This code checks for a quantity type for BMI and if it exists, it will create the sample — otherwise, the app will crash. If you’re looking for fluctuating data that doesn’t have a unit that’s defined clearly — like BMI is — you can use the count() method on HKUnit.
The HKHealthStore method is called to save the sample and notifies you if the process was successful from a trailing closure.
To hook this up to the UI:
- Access the ProfileViewController.swift and find the saveBodyMassIndexToHealthKit() method;
- Enter the code below in the BMI method:
Finally, we can create and run Prancercise Tracker by heading over to the Profile & BMI screen and loading your data from HeathKit. Complete this process by tapping on the Save BMI button and waiting for a notification, “successfully saved BMI Sample”.
Experience in Health and Fitness Data Sharing Implementation - Diversido Case
Google Fit and HealthKit integration into iPhone apps has proved very handy in app development. At Diversido, we've developed several healthcare and fitness apps using these technologies — one of them is Health Mentor.
.webp)
Our client understood that people are more likely to care for their health if they're encouraged and acknowledged for making steps towards well-being. Health Mentor is a solution for coaches to track their customers’ progress in their exercises, nutrition, and so on, — and to provide feedback that keeps them motivated to stay on track.
Health Monitor is enabled to connect to wearables and other apps that track users’ characteristics and sample data. It app can be used on Android and iOS through Google Fit and HealthKit integration — and Diversido is the one who made sure this functionality is available and well-performing.
Halfway to Your Healthcare App Being Ready
With the Apple HealthKit framework and Google Fit integration, it is now easier and faster to create eHealth applications, fitness & health trackers, and digital therapeutics with new features for Android, Web, and iOS devices.
Developers relying on Google Fit APIs will find it more accessible since it is an open-source platform compatible with a wide range of devices and operating systems. Within Apple HealthKit, there’ll be more data points available and better security. Сross-platform is the best solution here — for better reach and accessibility. If you find it difficult to implement these integrations on your own, you can always contact us at Diversido and let us do the technical part for you.
FAQ
1. What is HealthKit and Google Fit?
HealthKit is Apple’s health data platform for iOS apps. Google Fit is Google’s health tracking system for Android. Both let apps collect and share user health data safely.
2. Why use HealthKit and Google Fit in a healthcare app?
They let your app track fitness, heart rate, sleep, and more — all in one place. Integration builds user trust and adds value with personalised insights.
3. What is a HealthKit app?
A HealthKit app is any iOS application that uses Apple’s HealthKit API to read, write, or analyse user health data, such as workouts, vitals, or sleep.
4. How do you integrate Google Fit into an Android app?
Use the REST API or SDK, enable the Fitness API, and ask users for permissions. Then your app can read and write data using Google’s health tracking tools.
5. How do you integrate HealthKit into an iOS app?
Enable HealthKit in Xcode, configure privacy permissions, and use HealthKit APIs to read and save user health data securely.
6. What health data can apps access with HealthKit and Google Fit?
You can access steps, heart rate, blood pressure, weight, sleep, nutrition, and more — depending on user consent and device compatibility.
7. Is user data safe with HealthKit and Google Fit?
Yes. Both platforms require clear user permission, restrict sensitive data access, and support secure data handling practices.
8. Can I use HealthKit and Google Fit for cross-platform health apps?
Yes. Many developers combine both APIs to sync health data across iOS and Android, offering users a seamless experience on any device.
9. What are common problems with HealthKit and Google Fit integration?
Challenges include managing permissions, device compatibility, data syncing issues, and regulatory compliance.
10. Can I use HealthKit on Android?
No — HealthKit is exclusive to iOS. For Android, Google Fit or other APIs should be used to collect and manage health data.
11. Is Google Fit HIPAA compliant?
Google Fit is not inherently HIPAA-compliant. Developers must implement additional privacy safeguards to meet regulatory standards.
12. What’s the difference between HealthKit and Google Fit?
HealthKit is more medical-data-focused with iOS-only support, while Google Fit is broader in fitness tracking and supports Android and Wear OS.
.png)

